Chat widget
Install the Relay web widget with the minimum required config.
This page covers the smallest working widget install and the one optional step that matters if you want Shopify-authenticated helpdesk.
Minimum requirements
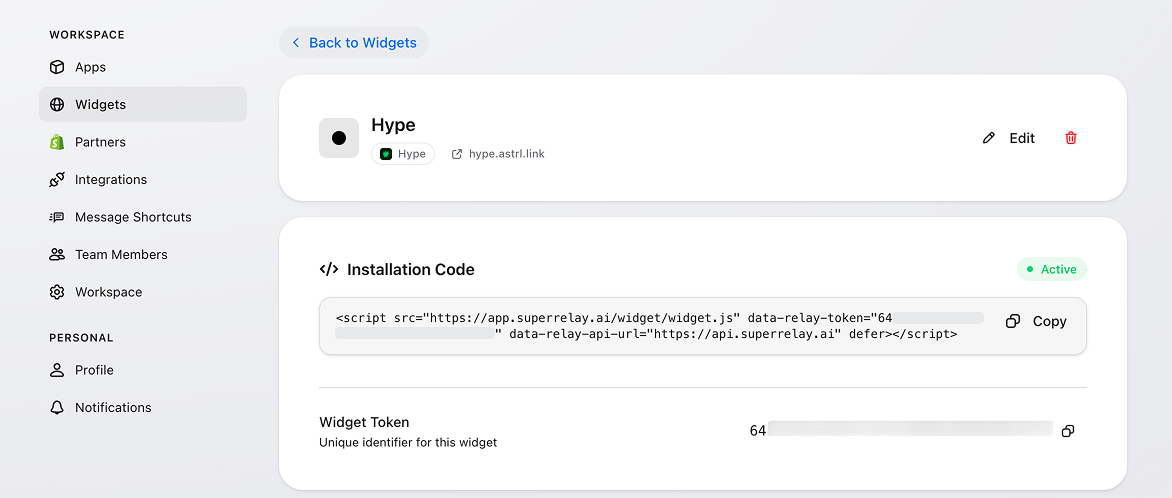
- A widget created in Settings → Widgets
- The widget install snippet from Relay
Install
Add the widget script to the site where you want the launcher to appear:
<script
  src="https://app.superrelay.ai/widget/widget.js"
  data-relay-token="YOUR_WIDGET_TOKEN"
  defer
></script>
Relay gives you the exact snippet after widget creation. In most cases, you should copy that snippet directly and avoid editing it.
If your site already knows who the visitor is, identify them with the widget SDK queue right after setup:
<script>
  window.$relay = window.$relay || []

  window.$relay.push([
    "identify",
    {
      name: "Jane Doe",
      email: "[email protected]",
      shopName: "acme.myshopify.com"
    }
  ])
</script>
Use the fields you actually have. For the full payload shape and the other widget commands, see Relay SDK.
What is required
data-relay-token: Required
Optional: custom API host
The hosted snippet already points at the correct Relay API, so you normally don't need anything else. If you self-host the API or need a different host, add the optional data-relay-api-url attribute:
<script
  src="https://app.superrelay.ai/widget/widget.js"
  data-relay-token="YOUR_WIDGET_TOKEN"
  data-relay-api-url="https://YOUR_API_HOST"
  defer
></script>
Set the default position
The widget anchors to bottom-right by default. If your site has UI in that corner — for example, a save button inside a mobile modal — you can flip the launcher to the opposite corner with the data-widget-position attribute:
<script
  src="https://app.superrelay.ai/widget/widget.js"
  data-relay-token="YOUR_WIDGET_TOKEN"
  data-widget-position="bottom-left"
  defer
></script>
Supported values are bottom-right (default) and bottom-left. This sets the position once at install time. If you need to move the widget in response to runtime events, use the position action in the Relay SDK instead.
Customization options
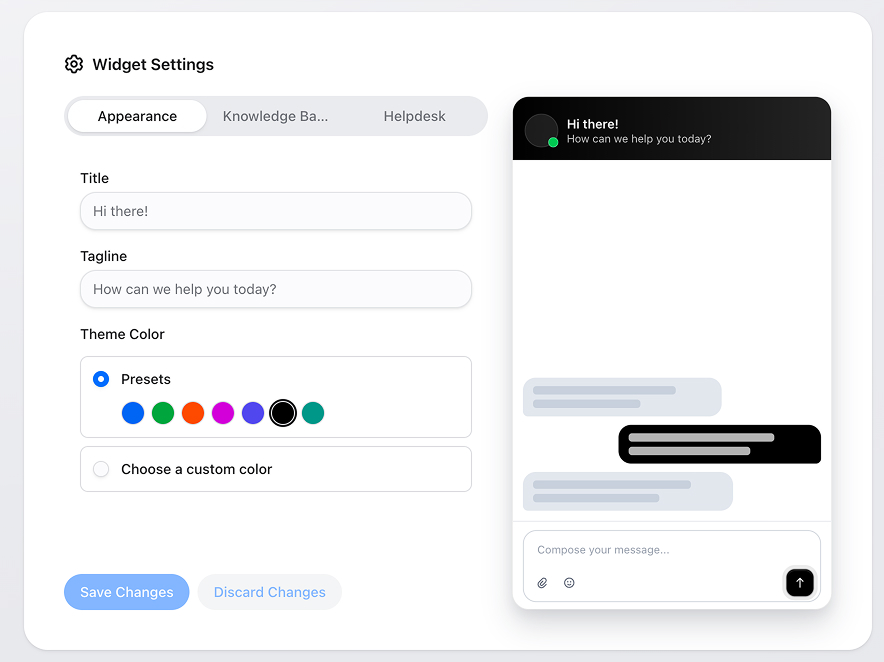
After the widget is created, you can adjust its content and styling in Settings → Widgets.
- Appearance: Change the welcome title, tagline, and theme color. You can use a preset color or choose a custom one.
- Knowledge Base: Turn on the knowledge base tab, rename it, and choose which knowledge base the widget should use.
- Helpdesk: Turn on the helpdesk tab, rename it, and allow users to raise new tickets from inside the widget.
If you only need basic chat, you can leave the knowledge base and helpdesk options off.
Persist sessions for known users
By default, Relay keeps a visitor on the same conversation by storing a session token in the browser. That works well for anonymous visitors, but it breaks the moment the same person opens your site on a different browser, switches devices, or clears storage.
If your app already knows who the signed-in user is, you can give Relay a per-user customer token. Whenever the widget connects with that token, Relay finds the same contact and resumes their most recent conversation — no cookies required, works across every device the user signs in on.
Pass the token via a script attribute:
<script
  src="https://app.superrelay.ai/widget/widget.js"
  data-relay-token="YOUR_WIDGET_TOKEN"
  data-relay-customer-token="THE_USERS_OPAQUE_TOKEN"
  defer
></script>
Or via a runtime global (useful when the token is fetched after page load):
<script>
  window.RELAY_CUSTOMER_TOKEN = "THE_USERS_OPAQUE_TOKEN"
</script>
What the token must look like
- Generated by your backend, not the browser. A
crypto.randomBytes(32).toString("hex")style value is ideal. - At least 20 characters. Shorter values are rejected.
- One token per signed-in user. Reusing a token across users will collapse them into the same Relay contact.
- Opaque to Relay — we never decode it, only look it up.
Treat it like a password
The customer token is a bearer credential. Anyone who has it can impersonate that user inside the widget, so:
- Only render it into pages your authenticated user is already viewing — never expose it to unauthenticated visitors or to other users.
- Serve it over HTTPS only.
- Rotate it (regenerate and update what your backend serves) if you suspect it has leaked. The next widget connect will pick up the new value.
How it interacts with shop identity
If you also use the authenticated helpdesk (next section), the customer token is matched first. Once a shop identity is verified, Relay also writes the customer token onto that contact, so subsequent connects can resume the same session even when no signed identity is available.
Authenticated helpdesk
Basic widget chat works without a verified shop identity.
If you want the authenticated helpdesk inside the widget:
- Link the widget to an app in Relay.
- Generate a Relay Secret for that app in Settings → Apps.
- Have your server sign the shop identity and expose it as
window.RelayEmbed.identity— see Identity Verification.
The helpdesk reads that signed identity to authenticate the visitor; your Shopify client secret is never involved.